Wednesday, October 5, 2016

Quicklook thumbnails.data parser


Earlier this year at the request of a reader I wrote a tool to parse the Quicklook thumbnails index.sqlite file. This sqlite database stores information related to thumbnails that have been generated on a system. This information includes filename, paths, timestamps and more (see my previous blogpost for more details).  The file is located under /private/var/folders/<random>/<random>/C/com.apple.QuickLook.thumbnailcache.

Someone else recently reached out to me and asked about the thumbnails.data file in the same folder, which holds the actual thumbnails. They were having issues carving the images out of this file.

Research

With a hex viewer, I opened a thumbnails.data file from my Mac and scrolled though the file. I didn't notice any typical image file headers as I scrolled. Below is a screen shot of what I was seeing:


Normally I would expect to see something like the following in hex view:


Here the file header shown in red is for a PNG file. I tried looking for the file headers for various other images as well, such as jpg, gifs and bmps but no luck.

I placed the com.apple.QuickLook.thumbnailcache folder on a wiped SD card and used a couple of carving programs to try and carve the images out of the thumbnails.data file. While the carvers were able to carve out the sqlite database, they did not find any images.

Interesting. I started to do some research, and I found a reference on this blog post that the images are stored as "raw bitmaps". "Raw bitmaps" are not the same as .bmp files. Raw bitmaps do not have a file header or footer and can not be decoded without external information. According to this website  the following are characteristics of a typical raw bitmap:

  • No header or footer
  • Uncompressed
  • Does not use a color palette
  • Cannot be decoded without external information, such as:
    • Color type and sample order (RGB, BGR, grayscale, etc.)
    • Image width in pixels
    • Row padding logic
    • Byte order and/or bit order
This explains why the file carvers I used were not able to carve out the images. File carvers need a file header in order to identify and carve out files. So if we don't have a file header, how do we carve out these images?  Luckily, the Quicklook index.sqlite table stores the "external" information needed to carve the images in the thunmbnails.data file.

This external information includes the bitmap location in the file, the length of the bitmap, width, and height.


Manually Carving

Below is an example of how this data looks from the database. For this example, the file file3251255366828.jpg actually has two thumbnails associated with it. One the is 64 X 64, and a larger one that is 164 X 164:


I am going to walk through how to manually carve out the 64 X 64 thumbnail  using the information from the Quicklook index.sqlite database. While I have written a parser to automate these steps (covered further below), I think it's nice to know how to manually do it so you can validate any tools you may use to do this, or if a tool doesn't work.


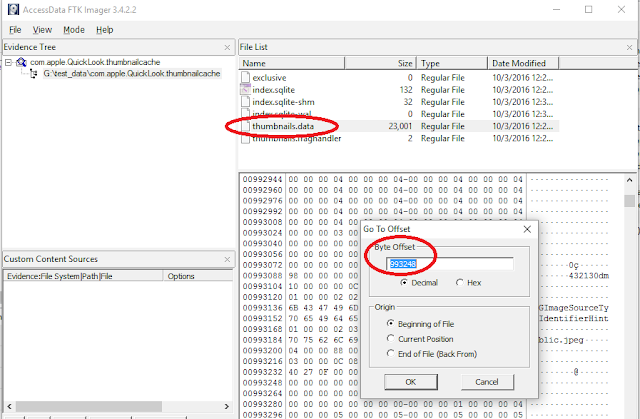
The first thing is to open up the thumbnails.data file with FTK Imager using the  File >  Add Evidence Item > Contents of a Folder. To get to the file offset, choose the file, right click in the hex area, then choose Go to offset...  The offset we want is the value in the thumbnails table bitmapdata_location field, 993284:


FTK will take us to the file offset. Once this has been done, we need to select the next 16384 bytes - the value from the thumbnails bitmapdata_length field. To do this, we can right click and choose "Set selection length":


And then fill in the value from the thumbnails bitmapdata_length field:


Once this has been done, we can save the selection out to a file named "image.data":


Now that we have saved the bitmap out to a file - what do with do with it? Remember, it doesn't have a file header so just renaming it to .jpg or .png will not work.  So how do we view it? Gimp -  a free photo editing program has the ability to open up a raw bitmap and gives you the option to supply the width, height and image type.

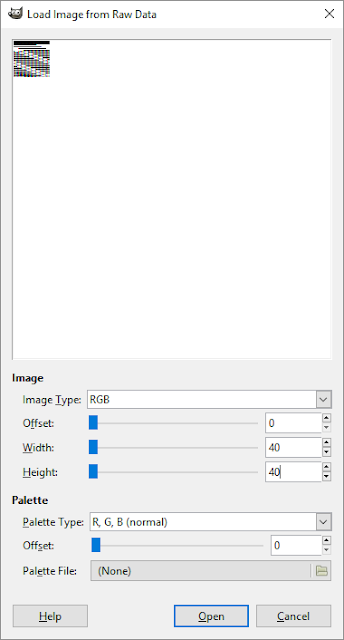
Use Gimp File > Open and select the Raw Image Data type. Opening up the image.data file presents the following dialog box:


Notice how the image looks all funky? That is because we have to specify the correct values to render the image. The image type is RGB Alpha (which I determined from monkeying around), and the width and height are 64 (which comes from the thumbnails table width and height) Once these are entered, the image displays correctly:


The Script
Who wants to do this manually for each image? Like usual, python to the rescue. For this particular script, I used a python library called Tkinter. This library let me build a GUI app, in python, that works on multiple platforms! How cool is that? The script also works from the command line as well.


To use the GUI, simply launch the python script with no commands:


Just to prove it works, here are screen shots of the same script working on Linux and Mac (tested on Ubuntu 14.4 and Mac OSX):


Using the Gui is pretty easy - select the folder containing the com.apple.QuickLook.thumbnailcache, and a folder that will hold the outputs created by the script. The script will generate a report of the files and create a subfolder containing the images. The Excel option will generate an Excel spreadsheet with the images embedded in it.

The command line syntax is as follows for tsv output:

python quicklook.py -d "C:\case\com.apple.Quicklook.thubmnailcache" -o "C:\case\quicklook_report"


The command line syntax is as follows for Excel output:

python quicklook.py -d "C:\case\com.apple.Quicklook.thubmnailcache" -o "C:\case\quicklook_report" -t excel


In order to use the script, the biplist and Pillow library needs to be installed. biplist is a python library for binary plist files, and Pillow is used to work with images. Both libraries are easy to install.

To install biplist use easy_install:

Linux/Mac: sudo easy_install biplist
Windows: C:\<PYTHONDIR>\scripts\easy_install.exe biplist

To install Pillow:

Linux/Mac: sudo pip install Pillow
Windows: C:\<PYTHONDIR>\scripts\pip.exe install Pillow

The default output is TSV, however, if you would like an excel report the xlswriter python library needs to be installed:

Linux/Mac: easy_install xlswriter
Windows: C:\<PYTHONDIR>\scripts\easy_install.exe xlswriter 

I have also included a compiled Windows executable if you don't want to mess with installing all the libraries.

Download the quicklook parser

Thursday, September 22, 2016

Mac Live Imaging: Functionality Versus Speed

My series on imaging a Mac would not be complete without covering how to do a live acquisition of a Mac. Now that FileVault2 appears to be the default during installs with Sierra, a live image may be very useful moving forward:


If a hard drive is encrypted, a live image will allow you to create a logical image of the partition in an unencrypted state. In my previous posts I covered how to image a Mac using single user mode and a Linux USB boot disk. I've put off doing this blog post because there is a very detailed and well written post by Matt at 505Forensics that covers this topic. In his blog post, Matt walks though step by step how to image a Mac using the FTK Imager command line tool for Mac OS X operating systems. As such, I wanted to cover how to do a live image using the dd command as another option.

Out in the field, I've found that it seems to take a longer time when using FTK Imager. I finally had a chance to do some testing and found that it took FTK Imager almost 2 hours to image a drive to a raw image (no compression). It took just 15 minutes using dd with an MD5. My test system was a MacBook Air, Early 2015, OS X El Capitan with a 75GB partition that was being imaged.

Using FTK command line has some distinct advantages over dd. There are options to compress the image, choose e01 format and supply case information.  However, if time and speed are an issue, dd may be a better option. For example, I've been onsite when 10 Macs needed to be imaged - dd was nice to use so we could finish up in time for dinner. If you can leave an image running overnight  - it's probably not as critical. See below for the test data:

FTK Imager: Total image time 1 hour, 49 min and 04 sec:


dd image with md5: 15 minutes


Please note - this testing is not by any means extensive (unlike the recent testing by Eric Zimmerman on some forensic software). I created several images using both methods and the image times listed above were about the same.

The first step is to run diskutil to see what the disk layout looks like and to determine what to image. I like to do this before I plug in my external USB. This makes it easier to see what drive needs to be imaged.

diskutil list


No FileVault2/No Encryption


My system has both OS X and Windows (Bootcamp) installed. As you can see /dev/disk0 is my physical drive. Partition 2 is the Machintosh HD and Partition 4 is the Windows aka Bootcamp partition. The logical, active device I want to image is /dev/disk1. As you can see in the screenshot above, it is listed as the logical, unencrypted volume and refers back to disk0s2. (If you do run across a system with Bootcamp you will probably want to grab that partition as well, but for the purpose of this blog post I am focusing on the Mac partition)

Below is a screen shot of what the same system looks like with FileVault2 turned on. Note that it says "Unlocked Encrypted". In this scenario, /dev/disk1 is logical volume I want to image.


Each /dev/disk has a corresponding /dev/rdisk:


rdisk is supposed to be faster than /dev/disk. As such, we are going to use /dev/rdisk1 instead of /dev/disk1 in the dd command.

Now would be a good time to plug in the external drive that will hold the image. On my system it auto mounted under /Volumes/<Device Name>

For dd, I am going to use the syntax suggested by the Forensic Wiki Page. The syntax looks something like this:

sudo dd if=/dev/rdisk1 bs=4k conv=sync,noerror of=/Volumes/MAC-Images/my_image.dd

 
Lets break down this command:

  • sudo: run as super user
  • if=/dev/rdisk1: this stands for input file. This will be the disk that requires imaging
  • bs=4k : this is the block size used when creating an image. The Forensic Wiki recommends 4k
  • conv=sync,noerror: if there is an error, null fill the rest of the block; do not error out

Better yet - let's add in an MD5 so we can have a hash of the image to make it more "forensicky". In order to do this:

dd if=/dev/rdisk1 bs=4k conv=sync,noerror | tee /Volumes/MAC-Images/my-image.dd | md5 > /Volumes/MAC-Images/my-image-md5.txt


According to the forensic wiki:
"The above alternate imaging command uses dd to read the hard-drive being imaged and outputs the data to tee. tee saves a copy of the data as your image file and also outputs a copy of the data to md5sum. md5sum calculates the hash which gets saved in mybgifile.md"
Try not to fat finger the password like I did though...

That's it! Happy imaging whichever tool you use.


Saturday, September 3, 2016

Cookie Cruncher Update, Timelines, Chrome Parser and more

I just wanted to pass on that I had a chance to update my Google Analytic Cookie Cruncher to support Firefox up to version 48. I can't believe it's been two years since I've updated the code!

I know I've said it before, but if you need me to update a tool to support a newer version of "X", please let me know - I'm happy to do so :) With everything else on my plate, I don't always have time to test each new browser for compatibility issues. Thanks to Heather Mahalik for reaching out to me with a student request to get it updated - sometimes I need that extra motivation.

I also updated my script that parses Google Analytics from Safari binary cookies. Mike O'Daniel reached out to me when the script crashed on him. Although he was unable to share the data due to privacy reasons, with a little back and forth trouble shooting we were able to determine what the issue was. He was parsing cookies from an iPad which contained URL encoded strings. None of my test data contained cookies formatted in this way and I did not have access to an iPad. Once the issue was fixed in the script he was off an running. Thanks to Mike for reaching out  to me to let me know that there were issues, and taking the time to help trouble shoot it since I was not able to replicate the issue.

I also wanted to push out a simple little parser for Chrome Internet History and Downloads. I recently spoke at the HTCIA conference  about mini-timelines (and even micro timelines). While this concept is nothing new, I have found this process to be invaluable during the cases I work. Harlan has blogged many times about the process and advantages of it, so I won't go into detail here. For the lab I taught, I just needed to output some basic Chrome Internet History into TLN format so I wrote a Chrome parser in python.

Now this tool does not show every single thing that is available in the Chrome History. I just stuck to the basic information: Visit time, URL, Hit Count etc. Sometimes too much information can cloud the timeline, making it difficult to pick out patterns of activity, or create so much noise the next lead gets lost in all the output.

I like the data in my timeline to be concise and clear. It reminds me a little of keyword searching. If the term is vague, you may be casting a wider net, but relative results could get buried in a million hits. It's going to take a lot of sifting to find that golden nugget. However, if you use a carefully crafted keyword, you can focus in on what it is you are looking for. Timelines are the same. Carefully picking the artifacts you want to add in to the timeline can help you hone in on relevant data quickly.

The other thing I wanted to discuss was Volatility plugins. I recently had the chance to run through a demo at a Python Meetup group on what Memory forensics is, and how Volatility can be used to analyze memory. As part of this, I "wrote" my first volatility plugin. Now, I say "wrote" because it was really just modifying a couple of lines in someone else's code to do something a little different.

Volatility has provided a nice interface to grab various keys from the registry. In fact, it reminds me of the way plugins are handled in RegRipper. If there is a key that you want that is not currently supported, look for a plugin that is similar and see if you can tweak it. It's a great way to start out, and as you tweak more and add a little bit here and there, you being to understand how things work.

I just started with something simple - pulling the computer name. This is just one key, with no binary data to convert:

HKLM\CurrentControlSet001\Control\ComputerName\ComputerName


I found another Volatility plugin that pulls a key from the system hive, shutdown.py - changed a few lines of code, and et voila! My first plugin. Ok - nothing earth shattering or difficult, but it's the first step in understanding how things work. That's often the way that I write many of my scripts - break it down into pieces, find code examples, and put it all together. Pretty soon I actually remember some of it, and my skill set advances.

The original code was written by Jamie Levy (@gleeda), and pulls the shutdown time from the registry. Below is a example of what I did. I just commented out what I didn't need, and modified what I did need.

While it may not be complex, it gets the job done and I learned something new in the process.

Tuesday, July 19, 2016

Mounting and Reimaging an Encrypted FileVault2 Mac Image in Linux

Before I continue my series on how to image Mac systems, I wanted to cover how to mount and work with FileVault2 encrypted Mac images. By "work with", I mean decrypt it and create an image of the decrypted volume in either raw (dd) or E01 format to pull into X-Ways, EnCase etc. To do this three things are needed:

1) A full disk image of the encrypted system in raw format (dd)
2) The SIFT Workstation  -  it has all the (free!) tools needed already installed
3) The password or recovery key for the volume.


For this example, I am going to use the encrypted disk image of a Mac I created from this previous turotiral. Below is what the encrypted image looks like in FTK Imager. Note that the second partition, MacOSX, is showing as an Unrecognized file system. This is because it is encrypted with FileVault2:


Another way to verify that the partition is encrypted is to look for the EncryptedRoot.plist.wipekey on the Recovery partition. In fact, we are going to need this to decrypt the drive, so I am just going to export out this file while I have it opened in FTK Imager. Mine was located under Recovery HD [HFS+]\Recovery HD\com.apple.boot.P\System\Library\Caches\com.apple.corestorage\EncryptedRoot.plist.wipekey:


If you're using SIFT in a VM, the first step is to create a shared folder(s) for where the image is located, and where you want your decrypted dd/E01 image to go. Here I have two USB drives shared as E: and G:. The E: drive contains my encrypted image and my EncryptedRoot.plist.wipekey file. The G: drive is where I am going to dump the unencrypted image. In Virtual Box  these settings were located under Settings > Shared Folders.


Next, I am going to make a mount point to mount the image:


Now I am going to change into the directory where I have my image and wipekey:


Joachim Metz has written a library, libfvde, to access FileVault encrypted volumes. I will be using fvdemount from this library to mount the encrypted partition. He has excellent documentation on his wiki  - I will pretty much be following that in the steps below.


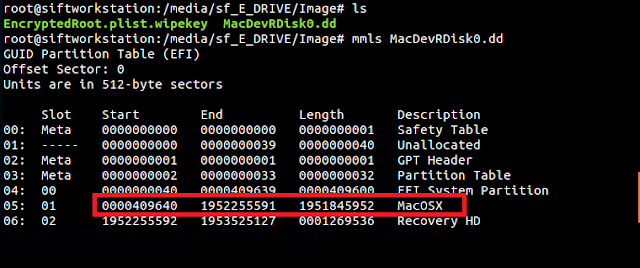
I need to get the partition offset in bytes to pass to fvdemount. mmls from the Sleuth Kit can be used to get the offset from the image:


According to output above, the MacOSX encrypted partition starts at sector 409640. To get the offset in bytes multiply the offset (409640) times 512 bytes / per sector. I will need to pass this offset (-o), the EncryptedRoot.plist.wipekey (-e),the password or recovery key (-p), my image and the mountpoint to fvdemount:


fvdemount will create a device file named "fvde1" under the mount point. A quick file command confirms it is the HFS volume:


To further verify everything is unencrypted, fvde1 can be mounted as a loopback device to show the files system:


As shown above, I can now see the unencrypted Mac partition.

If your preference is to work with an image under Windows with tools like X-Ways, EnCase etc, an image can be taken of the unencrypted device, /mnt/Mac/fvde1.

For E01 format, ewfaquire can be used:

ewfaquire /mnt/Mac/fvde1


For raw (dd) format the following syntax can be used. I like to have a progress bar so I am using using the pv command with dd. For dd, I am using the recommend parameters from the Forensic Wiki.

dd if=/mnt/Mac/fvde1 bs=4K conv=noerror,sync | pv -s 999345127424 | dd of=/media/sf_G_Drive/Image/Mac_fvdemount_unencrypted.dd


-s is the size, which can be taken from the length of the partition, 1951845925 sectors * 512 bytes/sector = 999345113600 bytes (aprox. 1TB)
 
After the image completes, it can now be be opened and viewed in all it's unencrypted glory in the tool of your choice:


A Mac system can also be used to mount an encrypted volume. I may write a post about that at a later time. I know not all examiners have access to a Mac system, so I wanted to focus on this method first. Plus, I like good 'Ol Tux.


Wednesday, July 6, 2016

How to image a Mac using Single User Mode

This is the second post in my series on different ways to image a Mac. My first post was on how to image a Mac with a bootable Linux distro. This post will cover another option, creating an image by booting a Mac into single-user mode. I plan on following up this post with posts on creating a live image and how to mount and work with FileVault encryption after an image is complete.

Single-user mode is a limited shell that a Mac can boot into before fully loading the operating system. In single-user mode, the internal hard drive is mounted read only and a limited set of commands are available. Once in single-user mode, a USB drive can be attached and dd can be used to create an image.

In order to mount the USB drive, the internal drive needs to be changed to read/write to create a mount point. While not as forensically sound as using a write blocker or booting into a Linux distro, less changes are made than fully booting the operating system to take a live image. This may be a good option where it is acceptable to get a live image, but the examiner wishes to minimize changes to the hard drive. Another benefit is that if there is FileVault encryption, the encrypted drive is decrypted after a username and password are supplied.

The system I used for testing was a Mac Mini, OS X Version 10.8.5 with one hard drive. Three partitions were created by default during the initial setup: an EFI partition, a MacOSX partition, and a recovery partition.

I tested two scenarios, one without encryption and one with encryption (FileVault 2). For each step I will cover both scenarios. The high level steps are:

1) Boot into single-user mode
2) Determine the disk to image
3) Mount the USB drive that will hold the image
4) Run the dd command to create the image

[Edit 8/1/2016] Please read the comments as well. I have had some people in the community provide some great tips and suggestions since this was posted!

Step 1 - Boot into single-user mode
The first step is to boot into single-user mode. While the system is booting, select COMMAND-S to enter single-user mode. I usually hold down this key combo before I even power on the system so I don't accidentally "miss" it. At this time, I do not to have the USB drive that will hold the image plugged in.

Unencrypted
If the system is not encrypted a bunch of white text will scroll and finally present a shell with root:


Encrypted
If the system is encrypted, some text will fly by that says efiboot, and then a GUI window will pop up asking for the username and password:


After the username and password are entered, the single-user boot process continues and drops into a shell similar to the unencrypted system.

Step 2 - Determine what to image
The next step is to determine what block device to copy for the dd command. In order to determine this, use the ls command to get a list of the available disks under the /dev directory. As I mentioned before, I prefer to do this before I plug the USB drive in so I don't have to try and guess which is the internal hard drive and which is the USB drive. (OS X has a disk utility called diskutil that presents more verbose information about the disks, however, it is not available in single-user mode)

ls /dev/disk*


The output is slightly different between the encrypted and unencrypted drive, which I discuss below.

Unencrypted Drive
On the test unencrypted system there is one disk, disk0, with three partitions: disk0s1, 
disk0s2, and disk0s3.  For this particular system, the image should be of /dev/disk0:


Encrypted Drive
Note the addition of the /dev/disk1 on the encrypted system:


What is this /dev/disk1? Using file -sL on each partition can give a little bit more insight into what is going on. (Note - I ran these commands while in a terminal because there was no good way for me to get a screen shot in single-user mode...the text went all the way across the screen. However, the commands and outputs are similar while in single-user mode)


From these results I can tell that disk0s1 is the EFI partition, and disk0s3 is an HFS partition. disk0s2 is showing as "data". This happens when the file command can't tell what the file is, it just gives a generic "data" in response - which makes sense if the partition is encrypted.

Some quick math give us the partition sizes:

EFI disk0s1 size = 409600 sectors X 512 bytes per sector =  209715200 bytes = ~210 MB
HFS disk0s3 size = 4096 bytes per block X 158692 blocks = 650002432 bytes = ~650 MB

Next, I want to see what size disk0s2 is. I can use fdisk /dev/disk0s2 for this:


disk0s2 size = 1951845952 sectors X 512 bytes per sector = 999345127424 bytes =~999.3 GB. Definitely the biggest of them all!

Now I want to see how big /dev/disk1 is to compare it to the other partitions. Here I will use /dev/rdisk1 because /dev/disk1 is busy. /dev/rdisk is the raw disk of /dev/disk1:

rdisk1 size = 4096 bytes per block X 243898823 blocks = 999009579008 bytes =~ 999 GB

/dev/disk0s2 and /dev/disk1 are about the same size, 999GB, and /dev/disk1 is a readable HFS partition. Based on my experience and the outputs above, it appears /dev/disk1 is the OS X partition (disk0s2) in a decrypted state.

For imaging, either /dev/disk0 or /dev/disk1 can be used. If /dev/disk0 is used, all three partitions will be captured, but the data in the MacOSX partition - /dev/disk0s2 will remain in the encrypted state. If /dev/disk1 is imaged, it will have the MacOSX data in an decrypted state,but will not have partition 1 (EFI partition) and partition 3 (Recovery partition). I like to grab both /dev/disk0 and /dev/disk1.


Step 3 - Mount the external USB Drive 
The next step is to mount the external USB drive so the image can be saved onto it. The USB drive can be formatted in FAT32 or HFS. FAT32 has the benefit of both Windows and Mac being able to access it, but it has a 4GB file size limit. While HFS does not have the 4GB limit, Windows is not able to see it by default (if you have a Mac with bootcamp your Windows OS should be able to read HFS if the bootcamp drivers are installed).

For my tests I used a FAT32 USB drive for the unencrypted system, and an HFS USB drive for the encrypted system so I could demonstrate the syntax for both.

After plugging in the USB drive, run ls /dev/disk* again. Compare the outputs to determine which /dev device belongs to the USB drive

ls /dev/disk*


Unencrypted
For this system the FAT32 USB drive has been inserted, which shows up as /dev/disk1. The partition that needs to be mounted is /dev/disk1s1:


Encrypted
For this system the HFS USB drive has been inserted, which shows up as /dev/disk2. This drive has two partitions. The partition that needs to be mounted is /dev/disk2s2:


(If there are multiple partitions showing on the USB drive the file -sL command can be used to get more information if you're not sure which one to mount.)

Once you've determined the USB device keep this handy for the mount command. The next few commands and outputs are the same for the unencrypted and encrypted system.

In order to mount the USB drive, the system drive will need to be changed to read/write by using mount -uw:
mount -uw /

[EDIT 8/1/2016]  **** Please read the comments. There is information on how you can mount without changing the system drive to read/write****[END EDIT]

Next, a mount point will need to be created for the USB drive. For this example, the mount point will be created under /tmp/usb:

ls /tmp
mkdir /tmp/usb


Now it's time to mount the USB drive.The mount command will need the partition type (FAT32 or HFS), the disk to mount, and a mount point.

 
Mount the FAT32 USB drive on the unencrypted system
To mount the FAT32 drive on the unencrypted system the following syntax was used:

mount -t msdos /dev/disk1s1 /tmp/usb


Mount the HFS Drive on the encrypted system
To mount the hfs drive on the encrypted system, the following syntax was used:
mount -t hfs /dev/disk2s2 /tmp/usb


I always create a subfolder on the USB drive to hold the image. This way I can list the contents of the mount point as a sanity check to ensure that it mounted ok:

ls /tmp/usb


Here I can see "MacEncryptedImage" and "MacImage", the folders I created on the USB drive. Everything looks good to go.

Step 4 - Create the image

To create the image, the dd command can be used.  For dd, I use the options recommend on the Forensic Wiki page. The syntax looks something like this:

dd if=/dev/disk0 bs=4k conv=sync,noerror of=/tmp/usb/mac_image.dd
 
Lets break down this command:

  • if=/dev/disk0: this stands for input file. This will be the disk that requires imaging
  • bs=4K : this is the block size used when creating an image. The Forensic Wiki recommends 4K
  • conv=sync,noerror: if there is an error, null fill the rest of the block; do not error out


If /dev/rdisk is available this can be used instead of /dev/disk. rdisk provides access to the raw disk which is supposed to be faster then /dev/disk which uses buffering.

Unencrypted system
For the unencrypted system the image will be of /dev/disk0 to a FAT32 USB mounted drive. Since FAT32 has a 4GB file size limit, dd will need to be piped through the split command to keep the file size under 4GB:

dd if=/dev/disk0 bs=4k conv=sync,noerror | split -b 2000m - /tmp/usb/Images/disk0.split.


Encrypted system
For the encrypted drive, this example will be of /dev/rdisk1. Since the image will be saved to an HFS USB drive there is no need to split the image:

dd if=/dev/rdisk1 bs=4k conv=noerror,sync of=/tmp/usb/MacEncryptedImage/Mac_rdisk1.dd


Unfortunately, dd does not have a progress bar so patience is a virtue. Once it's complete, a message similar to below should appear:


View Image
As a last step, I just wanted to show how each image looked when opened in FTK Imager.


Unencrypted
The unencrypted image looks as expected, three partitions in an unencrypted state:


Encrypted
During my testing, I imaged both /dev/rdisk0 and /dev/rdisk1. /dev/rdisk0 was the entire disk with all three partitions. Opening the rdisk0 image in FTK Imager confirms that all three partitions are present. As expected partition 2, MacOSX, is showing as an unrecognized file system because it is encrypted:


The image of /dev/rdisk1 was an image of just the second partition, which is the MacOSX partition. Opening it up in FTK Imager confirms that /dev/rdisk1 is in a decrypted state:


So, in summary, here are the steps and commands covered above:

  • Use Command-S to boot into single user mode
  • Use ls /dev/disk* to determine the disk(s) to image
  • Plug in the USB Drive
  • Use ls /dev/disk* to determine USB drive device
  • Use mount -uw / to change internal drive to read/write
  • Use mkdir /tmp/USB to create a mount point
  • Use mount to mount the USB Drive
    • mount -t msdos /dev/disk1s1 /tmp/usb (for FAT32)
    • mount -t hfs /dev/disk2s2 /tmp/usb (for HFS)
  • Create disk image using dd 
    • dd if=/dev/disk0 bs=4k conv=sync,noerror | split -b 2000m - /tmp/usb/disk0.split. (FAT32 USB)
    • dd if=/dev/rdisk0 bs=4k conv=noerror,sync of=/tmp/usb/rdisk0.dd (HFS USB)

While these steps worked on my test Mac, examiners should always test and research the model they are encountering. I was limited to one test system, one hard drive and FileVault2 encryption. I also recommend trying this on a test Mac before running these steps on actual evidence. Single user-mode logs in as root, and this can be very dangerous.  Remember - Trust but Verify! :)