
Someone else recently reached out to me and asked about the thumbnails.data file in the same folder, which holds the actual thumbnails. They were having issues carving the images out of this file.
Research
With a hex viewer, I opened a thumbnails.data file from my Mac and scrolled though the file. I didn't notice any typical image file headers as I scrolled. Below is a screen shot of what I was seeing:

Normally I would expect to see something like the following in hex view:

Here the file header shown in red is for a PNG file. I tried looking for the file headers for various other images as well, such as jpg, gifs and bmps but no luck.
I placed the com.apple.QuickLook.thumbnailcache folder on a wiped SD card and used a couple of carving programs to try and carve the images out of the thumbnails.data file. While the carvers were able to carve out the sqlite database, they did not find any images.
Interesting. I started to do some research, and I found a reference on this blog post that the images are stored as "raw bitmaps". "Raw bitmaps" are not the same as .bmp files. Raw bitmaps do not have a file header or footer and can not be decoded without external information. According to this website the following are characteristics of a typical raw bitmap:
- No header or footer
- Uncompressed
- Does not use a color palette
- Cannot be decoded without external information, such as:
- Color type and sample order (RGB, BGR, grayscale, etc.)
- Image width in pixels
- Row padding logic
- Byte order and/or bit order
This external information includes the bitmap location in the file, the length of the bitmap, width, and height.

Manually Carving
Below is an example of how this data looks from the database. For this example, the file file3251255366828.jpg actually has two thumbnails associated with it. One the is 64 X 64, and a larger one that is 164 X 164:

I am going to walk through how to manually carve out the 64 X 64 thumbnail using the information from the Quicklook index.sqlite database. While I have written a parser to automate these steps (covered further below), I think it's nice to know how to manually do it so you can validate any tools you may use to do this, or if a tool doesn't work.
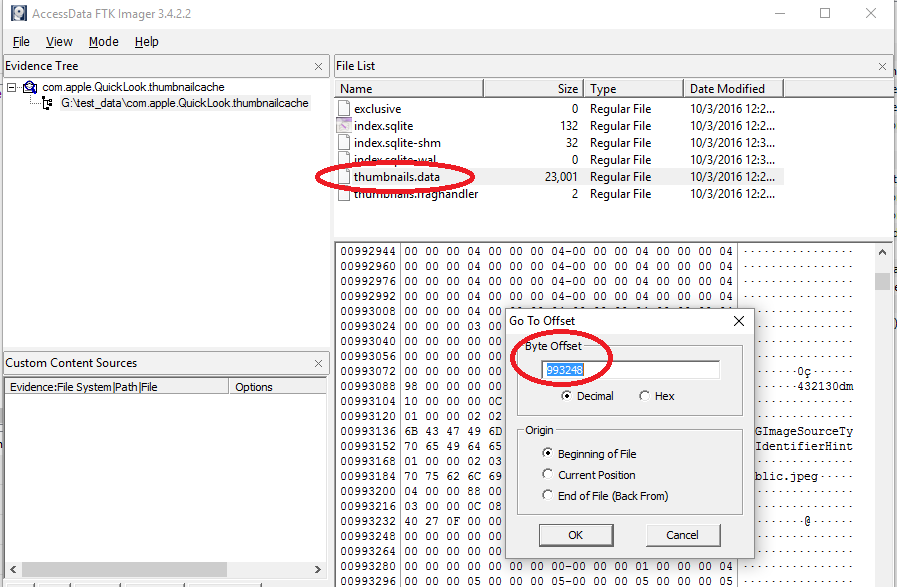
The first thing is to open up the thumbnails.data file with FTK Imager using the File > Add Evidence Item > Contents of a Folder. To get to the file offset, choose the file, right click in the hex area, then choose Go to offset... The offset we want is the value in the thumbnails table bitmapdata_location field, 993284:
FTK will take us to the file offset. Once this has been done, we need to select the next 16384 bytes - the value from the thumbnails bitmapdata_length field. To do this, we can right click and choose "Set selection length":

And then fill in the value from the thumbnails bitmapdata_length field:

Once this has been done, we can save the selection out to a file named "image.data":

Now that we have saved the bitmap out to a file - what do with do with it? Remember, it doesn't have a file header so just renaming it to .jpg or .png will not work. So how do we view it? Gimp - a free photo editing program has the ability to open up a raw bitmap and gives you the option to supply the width, height and image type.
Use Gimp File > Open and select the Raw Image Data type. Opening up the image.data file presents the following dialog box:

Notice how the image looks all funky? That is because we have to specify the correct values to render the image. The image type is RGB Alpha (which I determined from monkeying around), and the width and height are 64 (which comes from the thumbnails table width and height) Once these are entered, the image displays correctly:

The Script
Who wants to do this manually for each image? Like usual, python to the rescue. For this particular script, I used a python library called Tkinter. This library let me build a GUI app, in python, that works on multiple platforms! How cool is that? The script also works from the command line as well.
To use the GUI, simply launch the python script with no commands:

Just to prove it works, here are screen shots of the same script working on Linux and Mac (tested on Ubuntu 14.4 and Mac OSX):


Using the Gui is pretty easy - select the folder containing the com.apple.QuickLook.thumbnailcache, and a folder that will hold the outputs created by the script. The script will generate a report of the files and create a subfolder containing the images. The Excel option will generate an Excel spreadsheet with the images embedded in it.
The command line syntax is as follows for tsv output:
python quicklook.py -d "C:\case\com.apple.Quicklook.thubmnailcache" -o "C:\case\quicklook_report"
The command line syntax is as follows for Excel output:
python quicklook.py -d "C:\case\com.apple.Quicklook.thubmnailcache" -o "C:\case\quicklook_report" -t excel
In order to use the script, the biplist and Pillow library needs to be installed. biplist is a python library for binary plist files, and Pillow is used to work with images. Both libraries are easy to install.
To install biplist use easy_install:
Linux/Mac: sudo easy_install biplist
Windows: C:\<PYTHONDIR>\scripts\easy_install.exe biplist
To install Pillow:
Linux/Mac: sudo pip install Pillow
Windows: C:\<PYTHONDIR>\scripts\pip.exe install Pillow
The default output is TSV, however, if you would like an excel report the xlswriter python library needs to be installed:
Linux/Mac: easy_install xlswriter
Windows: C:\<PYTHONDIR>\scripts\easy_install.exe xlswriter
I have also included a compiled Windows executable if you don't want to mess with installing all the libraries.
Download the quicklook parser