Wednesday, June 13, 2018

Malicious PowerShell in the Registry: Persistence

This is the second part in my series on Finding and Decoding Malicious PowerShell Scripts. My first blog post walked through how to find malicious PowerShell scripts in the System event log, and the various steps to decode them. In this post, I wanted to discuss another location where malicious PowerShell scripts might be hiding - the Registry.

The Registry is a great place for an attacker to establish persistence. Popular locations for this are the Run keys located in either the Software Hive, or in a User's ntuser.dat hive. For a list of run keys, check out the Forensic Wiki.

A technique I've seen in some cases I've worked is an attacker using PowerShell in the Run key to call another key that contains the base64 code that contains a payload.

Let's see what an example of this looks like. Using Eric Zimmerman's Registry Explorer I've navigated to the following registry key: HKLM\Software\Microsoft\Windows\CurrentVersion\Run. Underneath the value "hztGpoWa" the following entry is made:


You can also use Harlan's RegRipper's soft_run plugin to pull this information:

rip.exe -r SOFTWARE -p soft_run

 Output:


(for the NTUSER.DAT hive, use the user_run plugin)

So what does this command do? %COMSPEC% is the system variable for cmd.exe. This uses cmd.exe to launch PowerShell in a hidden window. It then uses the PowerShell command  "Get-Item" to get another registry key - HKLM:Software\4MX64uqR, and the value Dp8m09KD under that key.

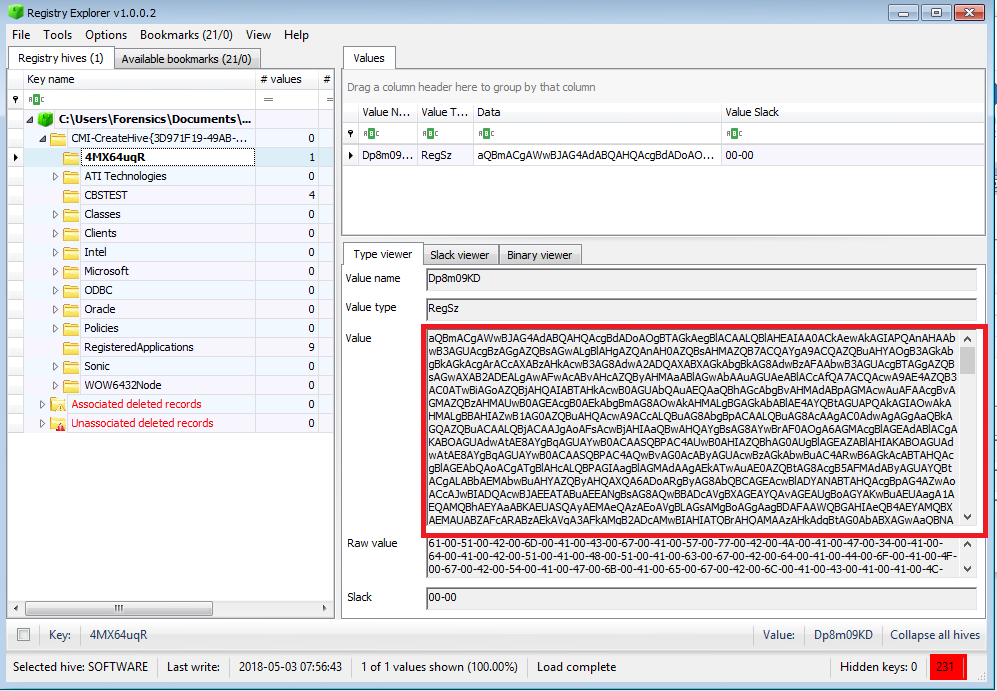
Browsing to the HKLM:Software\4MX64uqR key in Registry Explorer reveals a whole mess of base64:


Another way to pull base64 like this from the registry is to use the "sizes" plugin from RegRipper. This will search the registry hive for values over a certain threshold and dump them out:

 rip.exe -r SOFTWARE -p sizes

(A thanks to Harlan for updating this plugin! Make sure to update it if you haven't recently.)

To see the detailed steps of how to decode this base64, take a look at my earlier blog post on decoding malicious PowerShell scripts.

Here are the high-level steps to decode it:
  • Decode unicode base64 in registry key
  • Decode and decompress (gzip) embedded base64 
  • Decode another round of embedded base64
  • payload = shellcode
  • Try running scdb.exe or strings over shellcode for resulting IP address and port
The resulting code more often than not is a way to establish a Meterpreter reverse shell.

Another way to find instances of malicious PowerShell in the registry is to search the registry for "%COMSPEC%".

I used  Registry Explorer and it's handy Find command to do this. Make sure and have the right "Search in" boxes selected:


While this example showed registry keys and values with random names - this is not always the case. These names can be whatever the attacker wants and they will not always be an obvious tip off like a random name.

For my example, I used Metasploit to install this persistence mechanism in the registry. Check out all the options available. As mentioned above, the registry key/value names may be set to anything:


My next post on malicious PowerShell scripts will cover PowerShell logging and pulling information from memory. Happy Hunting!

Friday, January 5, 2018

Mounting an APFS image in Linux

As a follow up to my post on how to mount AFPS images on Windows, I wanted to post about how to mount an APFS image on a Linux system. If you are looking for how to mount an APFS image on a Mac, Sarah Edwards wrote a awesome blog post on how to do this. There is also another one over at BlackBag.If you are new to APFS, I would also recommend an informative video by Steve Whalen where he explains APFS in detail.

Options, options, options. It's always nice to have options in forensics. Sometimes one way may not work for you, or maybe you don't have access to a Mac at the moment. If you are on a Windows machine and need access to an APFS volume or image (E01 or raw), it's easy enough to spin up a Linux VM and get to work.

For my testing, I used an experimental Linux APFS driver by sgan81 - apfs-fuse. Note the word "experimental" - and read the disclaimers by the author. I would strongly recommend verifying any results with another tool or method, such as the one detailed by Sarah Edwards. However, this method works in a pinch, and at least you can start analysis until you get things working on a Mac. Oh - and according to the documentation, it will prompt you for a password if the volume is encrypted.

These instructions assume that you already have an image of the Mac, either in E01 or raw format (dd, dmg, etc). For my Linux distro, I used the free SIFT Workstation Virtual Machine on Ubutnu 16.04.  If you are using another Linux distro, you may need to install additional dependencies, etc.

Preparing the SIFT Workstation

First things first, some dependencies need to be installed before apfs-fuse will work. As always, run sudo apt-get update before installing any dependencies:

sudo apt-get update
sudo apt-get install libattr1-dev

If you are running a version of SIFT prior to the one based on Ubuntu 16.04, a couple of additional dependencies may be needed. This includes a newer version of cmake. This can be installed by following the instructions on the cmake website. In addition to cmake, older version of SIFT may also need the the ICU library:

sudo apt-get install libicu-dev


Download and build apfs-fuse

Next, download the apfs-fuse driver from github:

git clone https://github.com/sgan81/apfs-fuse

Now compile it, and install it:

cd apf-fuse
mkdir build
cd build
cmake ..
make


Mounting the E01 Image

Now that the SIFT workstation has been set up, we can mount the E01 image. If you have a dd/raw image, you can skip to the next step.

I like using the ewfmount tool in SIFT to mount E01s. Once mounted, there will be a "virtual"  raw image of the E01 file under the designated mount point. The syntax is simple, and works on split images as well (just specify the first segment for split images).

syntax:
ewfmount <image name> <mount point>
example:
ewfmount mac_image.E01 /mnt/ewf


If you have issues with ewfmount, check out this blog post for some alternative tools to mount ewf files.

Mounting the raw image to a loopback device

Now that we have a dd/raw image to work with  - either from mounting the E01, or because that is how the image was taken - we'll mount it to a loopback device. The Linux apfs-fuse driver needs the volume where the APFS container is. Because the disk image may contain additional partitions, we will need to figure out the offset where the APFS partition begins.

Below is a screen shot in X-Ways. Here was can see that X-Ways identified an APFS partition starting at sector 76,806 as well as 4096 bytes per sector (note, although X-Ways identified the partition as being APFS, it did not parse it out).


Alternatively, we can use the Sleuthkit tool mmls to list the partitions on the image. Here was can see that there is a "NoName" partition that starts right after the EFI System Partition. The offset is 76806 and is the largest partition on the drive. The Units are also displayed as 4096 bytes per sector:

To run mmls on the mounted EWF:
mmls /mnt/ewf/ewf1
To run mmls on a dd/raw image:
mmls mac_image.dd


To set up the looback device, we will need to supply the APFS starting partition offset in bytes. Since the offset is given in sectors, we will need to convert from sectors to bytes by multiplying 4096 bytes/per sector times  the number sectors:
4096 X 76806 =  314597376

Armed with this information, we can mount the "NoName" partition, aka the APFS partition, to a loopback device:

For the mounted EWF file:
losetup -r -o 314597376 /dev/loop0 /mnt/ewf/ewf1
for the dd/raw image:
losetup -r -o 314597376 /dev/loop0 mac_image.dd


In the syntax above, -r is read only, and -o is the offset in bytes to the start of the APFS partition.

Mount up the APFS filesystem

Ok! Finally! Now we are ready to mount up the APFS partition to the filesystem. The apf-fuse binary will be in a folder name "bin" within the build folder created earlier when the apfs-driver was installed. Change into that directory, and run apfs-fuse by pointing it to the loopback device and a mount point:

mkdir /mnt/apfs
./apfs-fuse /dev/loop0 /mnt/apfs


In my testing, the cursor just blinks and does not give a status message. I opened another terminal  and did an ls command on the mount point to see if it mounted ok:


Success! Now I can run AV Scans, view files, and export out any files as needed.

As I mentioned before - this is an experimental driver and all results should be verified. Hopefully as time passes we will have more ways to mount and access APFS images in Linux, and our mainstream tools.

Monday, January 1, 2018

How to mount Mac APFS images in Windows

APFS is the new file system for Mac OS, and so far, many forensic suites are playing catch up as far as support goes. As such, workarounds may need to be employed in order to conduct analysis on Mac OS APFS images. This short blog post will cover one of those workarounds -  mounting an APFS image in Windows.

Paragon has a free (preview) driver to mount APFS volumes in Windows!!!! Sweet!!!

APFS for Windows is going to look for a connected APFS drive. Since we have an image, we will need to mount the image as a SCSI device so the Windows APFS driver can see it. To do this, we will use Arsenal Image Mounter.


Mount the image using Arsenal Image Mounter. I had to select the sector size of 4096 for it to work since the sector size in my image was 4096 (If you need to know the sector size of your image, you can use a tool like mmls to check).


Download and install APFS for Windows from Paragon and launch it. It should automatically detect the APFS volume:


Now you can browse the APFS drive in Windows:


And add it to your favorite all in one tool, like X-Ways, as a logical drive:


Happy Hunting!