
For my testing, I used an experimental Linux APFS driver by sgan81 - apfs-fuse. Note the word "experimental" - and read the disclaimers by the author. I would strongly recommend verifying any results with another tool or method, such as the one detailed by Sarah Edwards. However, this method works in a pinch, and at least you can start analysis until you get things working on a Mac. Oh - and according to the documentation, it will prompt you for a password if the volume is encrypted.
These instructions assume that you already have an image of the Mac, either in E01 or raw format (dd, dmg, etc). For my Linux distro, I used the free SIFT Workstation Virtual Machine on Ubutnu 16.04. If you are using another Linux distro, you may need to install additional dependencies, etc.
Preparing the SIFT Workstation
First things first, some dependencies need to be installed before apfs-fuse will work. As always, run sudo apt-get update before installing any dependencies:
sudo apt-get update
sudo apt-get install libattr1-dev
sudo apt-get install libattr1-dev
If you are running a version of SIFT prior to the one based on Ubuntu 16.04, a couple of additional dependencies may be needed. This includes a newer version of cmake. This can be installed by following the instructions on the cmake website. In addition to cmake, older version of SIFT may also need the the ICU library:
sudo apt-get install libicu-dev
Download and build apfs-fuse
Next, download the apfs-fuse driver from github:
git clone https://github.com/sgan81/apfs-fuse
Now compile it, and install it:
cd apf-fuse
mkdir build
cd build
cmake ..
make
mkdir build
cd build
cmake ..
make
Mounting the E01 Image
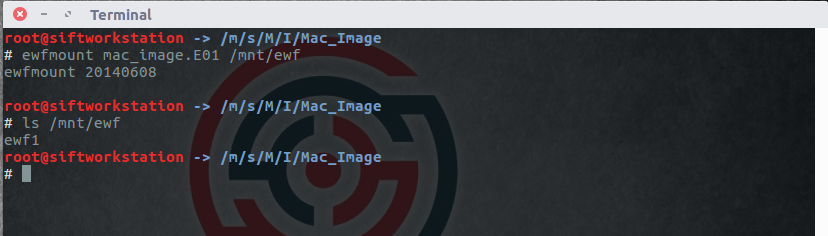
Now that the SIFT workstation has been set up, we can mount the E01 image. If you have a dd/raw image, you can skip to the next step.I like using the ewfmount tool in SIFT to mount E01s. Once mounted, there will be a "virtual" raw image of the E01 file under the designated mount point. The syntax is simple, and works on split images as well (just specify the first segment for split images).
syntax:
ewfmount <image name> <mount point>
example:
ewfmount mac_image.E01 /mnt/ewf
If you have issues with ewfmount, check out this blog post for some alternative tools to mount ewf files.
Mounting the raw image to a loopback device
Now that we have a dd/raw image to work with - either from mounting the E01, or because that is how the image was taken - we'll mount it to a loopback device. The Linux apfs-fuse driver needs the volume where the APFS container is. Because the disk image may contain additional partitions, we will need to figure out the offset where the APFS partition begins.Below is a screen shot in X-Ways. Here was can see that X-Ways identified an APFS partition starting at sector 76,806 as well as 4096 bytes per sector (note, although X-Ways identified the partition as being APFS, it did not parse it out).

Alternatively, we can use the Sleuthkit tool mmls to list the partitions on the image. Here was can see that there is a "NoName" partition that starts right after the EFI System Partition. The offset is 76806 and is the largest partition on the drive. The Units are also displayed as 4096 bytes per sector:

To run mmls on the mounted EWF:
mmls /mnt/ewf/ewf1
To run mmls on a dd/raw image:
mmls mac_image.dd
To set up the looback device, we will need to supply the APFS starting partition offset in bytes. Since the offset is given in sectors, we will need to convert from sectors to bytes by multiplying 4096 bytes/per sector times the number sectors:
4096 X 76806 = 314597376
Armed with this information, we can mount the "NoName" partition, aka the APFS partition, to a loopback device:
For the mounted EWF file:
losetup -r -o 314597376 /dev/loop0 /mnt/ewf/ewf1
for the dd/raw image:
losetup -r -o 314597376 /dev/loop0 mac_image.dd

In the syntax above, -r is read only, and -o is the offset in bytes to the start of the APFS partition.
Mount up the APFS filesystem
Ok! Finally! Now we are ready to mount up the APFS partition to the filesystem. The apf-fuse binary will be in a folder name "bin" within the build folder created earlier when the apfs-driver was installed. Change into that directory, and run apfs-fuse by pointing it to the loopback device and a mount point:
mkdir /mnt/apfs
./apfs-fuse /dev/loop0 /mnt/apfs
./apfs-fuse /dev/loop0 /mnt/apfs

In my testing, the cursor just blinks and does not give a status message. I opened another terminal and did an ls command on the mount point to see if it mounted ok:

Success! Now I can run AV Scans, view files, and export out any files as needed.
As I mentioned before - this is an experimental driver and all results should be verified. Hopefully as time passes we will have more ways to mount and access APFS images in Linux, and our mainstream tools.
Thank you for posting this information, easy to follow and functional.
ReplyDeleteAwesome! Nice work Mari.
ReplyDelete