Wednesday, July 6, 2016

How to image a Mac using Single User Mode

This is the second post in my series on different ways to image a Mac. My first post was on how to image a Mac with a bootable Linux distro. This post will cover another option, creating an image by booting a Mac into single-user mode. I plan on following up this post with posts on creating a live image and how to mount and work with FileVault encryption after an image is complete.

Single-user mode is a limited shell that a Mac can boot into before fully loading the operating system. In single-user mode, the internal hard drive is mounted read only and a limited set of commands are available. Once in single-user mode, a USB drive can be attached and dd can be used to create an image.

In order to mount the USB drive, the internal drive needs to be changed to read/write to create a mount point. While not as forensically sound as using a write blocker or booting into a Linux distro, less changes are made than fully booting the operating system to take a live image. This may be a good option where it is acceptable to get a live image, but the examiner wishes to minimize changes to the hard drive. Another benefit is that if there is FileVault encryption, the encrypted drive is decrypted after a username and password are supplied.

The system I used for testing was a Mac Mini, OS X Version 10.8.5 with one hard drive. Three partitions were created by default during the initial setup: an EFI partition, a MacOSX partition, and a recovery partition.

I tested two scenarios, one without encryption and one with encryption (FileVault 2). For each step I will cover both scenarios. The high level steps are:

1) Boot into single-user mode
2) Determine the disk to image
3) Mount the USB drive that will hold the image
4) Run the dd command to create the image

[Edit 8/1/2016] Please read the comments as well. I have had some people in the community provide some great tips and suggestions since this was posted!

Step 1 - Boot into single-user mode
The first step is to boot into single-user mode. While the system is booting, select COMMAND-S to enter single-user mode. I usually hold down this key combo before I even power on the system so I don't accidentally "miss" it. At this time, I do not to have the USB drive that will hold the image plugged in.

Unencrypted
If the system is not encrypted a bunch of white text will scroll and finally present a shell with root:


Encrypted
If the system is encrypted, some text will fly by that says efiboot, and then a GUI window will pop up asking for the username and password:


After the username and password are entered, the single-user boot process continues and drops into a shell similar to the unencrypted system.

Step 2 - Determine what to image
The next step is to determine what block device to copy for the dd command. In order to determine this, use the ls command to get a list of the available disks under the /dev directory. As I mentioned before, I prefer to do this before I plug the USB drive in so I don't have to try and guess which is the internal hard drive and which is the USB drive. (OS X has a disk utility called diskutil that presents more verbose information about the disks, however, it is not available in single-user mode)

ls /dev/disk*


The output is slightly different between the encrypted and unencrypted drive, which I discuss below.

Unencrypted Drive
On the test unencrypted system there is one disk, disk0, with three partitions: disk0s1, 
disk0s2, and disk0s3.  For this particular system, the image should be of /dev/disk0:


Encrypted Drive
Note the addition of the /dev/disk1 on the encrypted system:


What is this /dev/disk1? Using file -sL on each partition can give a little bit more insight into what is going on. (Note - I ran these commands while in a terminal because there was no good way for me to get a screen shot in single-user mode...the text went all the way across the screen. However, the commands and outputs are similar while in single-user mode)


From these results I can tell that disk0s1 is the EFI partition, and disk0s3 is an HFS partition. disk0s2 is showing as "data". This happens when the file command can't tell what the file is, it just gives a generic "data" in response - which makes sense if the partition is encrypted.

Some quick math give us the partition sizes:

EFI disk0s1 size = 409600 sectors X 512 bytes per sector =  209715200 bytes = ~210 MB
HFS disk0s3 size = 4096 bytes per block X 158692 blocks = 650002432 bytes = ~650 MB

Next, I want to see what size disk0s2 is. I can use fdisk /dev/disk0s2 for this:


disk0s2 size = 1951845952 sectors X 512 bytes per sector = 999345127424 bytes =~999.3 GB. Definitely the biggest of them all!

Now I want to see how big /dev/disk1 is to compare it to the other partitions. Here I will use /dev/rdisk1 because /dev/disk1 is busy. /dev/rdisk is the raw disk of /dev/disk1:
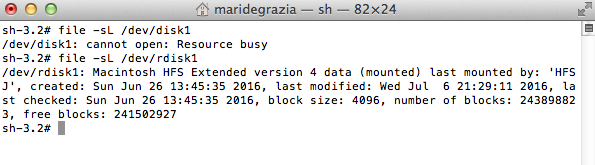
rdisk1 size = 4096 bytes per block X 243898823 blocks = 999009579008 bytes =~ 999 GB

/dev/disk0s2 and /dev/disk1 are about the same size, 999GB, and /dev/disk1 is a readable HFS partition. Based on my experience and the outputs above, it appears /dev/disk1 is the OS X partition (disk0s2) in a decrypted state.

For imaging, either /dev/disk0 or /dev/disk1 can be used. If /dev/disk0 is used, all three partitions will be captured, but the data in the MacOSX partition - /dev/disk0s2 will remain in the encrypted state. If /dev/disk1 is imaged, it will have the MacOSX data in an decrypted state,but will not have partition 1 (EFI partition) and partition 3 (Recovery partition). I like to grab both /dev/disk0 and /dev/disk1.


Step 3 - Mount the external USB Drive 
The next step is to mount the external USB drive so the image can be saved onto it. The USB drive can be formatted in FAT32 or HFS. FAT32 has the benefit of both Windows and Mac being able to access it, but it has a 4GB file size limit. While HFS does not have the 4GB limit, Windows is not able to see it by default (if you have a Mac with bootcamp your Windows OS should be able to read HFS if the bootcamp drivers are installed).

For my tests I used a FAT32 USB drive for the unencrypted system, and an HFS USB drive for the encrypted system so I could demonstrate the syntax for both.

After plugging in the USB drive, run ls /dev/disk* again. Compare the outputs to determine which /dev device belongs to the USB drive

ls /dev/disk*


Unencrypted
For this system the FAT32 USB drive has been inserted, which shows up as /dev/disk1. The partition that needs to be mounted is /dev/disk1s1:


Encrypted
For this system the HFS USB drive has been inserted, which shows up as /dev/disk2. This drive has two partitions. The partition that needs to be mounted is /dev/disk2s2:


(If there are multiple partitions showing on the USB drive the file -sL command can be used to get more information if you're not sure which one to mount.)

Once you've determined the USB device keep this handy for the mount command. The next few commands and outputs are the same for the unencrypted and encrypted system.

In order to mount the USB drive, the system drive will need to be changed to read/write by using mount -uw:
mount -uw /

[EDIT 8/1/2016]  **** Please read the comments. There is information on how you can mount without changing the system drive to read/write****[END EDIT]

Next, a mount point will need to be created for the USB drive. For this example, the mount point will be created under /tmp/usb:

ls /tmp
mkdir /tmp/usb


Now it's time to mount the USB drive.The mount command will need the partition type (FAT32 or HFS), the disk to mount, and a mount point.

 
Mount the FAT32 USB drive on the unencrypted system
To mount the FAT32 drive on the unencrypted system the following syntax was used:

mount -t msdos /dev/disk1s1 /tmp/usb


Mount the HFS Drive on the encrypted system
To mount the hfs drive on the encrypted system, the following syntax was used:
mount -t hfs /dev/disk2s2 /tmp/usb


I always create a subfolder on the USB drive to hold the image. This way I can list the contents of the mount point as a sanity check to ensure that it mounted ok:

ls /tmp/usb


Here I can see "MacEncryptedImage" and "MacImage", the folders I created on the USB drive. Everything looks good to go.

Step 4 - Create the image

To create the image, the dd command can be used.  For dd, I use the options recommend on the Forensic Wiki page. The syntax looks something like this:

dd if=/dev/disk0 bs=4k conv=sync,noerror of=/tmp/usb/mac_image.dd
 
Lets break down this command:

  • if=/dev/disk0: this stands for input file. This will be the disk that requires imaging
  • bs=4K : this is the block size used when creating an image. The Forensic Wiki recommends 4K
  • conv=sync,noerror: if there is an error, null fill the rest of the block; do not error out


If /dev/rdisk is available this can be used instead of /dev/disk. rdisk provides access to the raw disk which is supposed to be faster then /dev/disk which uses buffering.

Unencrypted system
For the unencrypted system the image will be of /dev/disk0 to a FAT32 USB mounted drive. Since FAT32 has a 4GB file size limit, dd will need to be piped through the split command to keep the file size under 4GB:

dd if=/dev/disk0 bs=4k conv=sync,noerror | split -b 2000m - /tmp/usb/Images/disk0.split.


Encrypted system
For the encrypted drive, this example will be of /dev/rdisk1. Since the image will be saved to an HFS USB drive there is no need to split the image:

dd if=/dev/rdisk1 bs=4k conv=noerror,sync of=/tmp/usb/MacEncryptedImage/Mac_rdisk1.dd


Unfortunately, dd does not have a progress bar so patience is a virtue. Once it's complete, a message similar to below should appear:


View Image
As a last step, I just wanted to show how each image looked when opened in FTK Imager.


Unencrypted
The unencrypted image looks as expected, three partitions in an unencrypted state:


Encrypted
During my testing, I imaged both /dev/rdisk0 and /dev/rdisk1. /dev/rdisk0 was the entire disk with all three partitions. Opening the rdisk0 image in FTK Imager confirms that all three partitions are present. As expected partition 2, MacOSX, is showing as an unrecognized file system because it is encrypted:


The image of /dev/rdisk1 was an image of just the second partition, which is the MacOSX partition. Opening it up in FTK Imager confirms that /dev/rdisk1 is in a decrypted state:


So, in summary, here are the steps and commands covered above:

  • Use Command-S to boot into single user mode
  • Use ls /dev/disk* to determine the disk(s) to image
  • Plug in the USB Drive
  • Use ls /dev/disk* to determine USB drive device
  • Use mount -uw / to change internal drive to read/write
  • Use mkdir /tmp/USB to create a mount point
  • Use mount to mount the USB Drive
    • mount -t msdos /dev/disk1s1 /tmp/usb (for FAT32)
    • mount -t hfs /dev/disk2s2 /tmp/usb (for HFS)
  • Create disk image using dd 
    • dd if=/dev/disk0 bs=4k conv=sync,noerror | split -b 2000m - /tmp/usb/disk0.split. (FAT32 USB)
    • dd if=/dev/rdisk0 bs=4k conv=noerror,sync of=/tmp/usb/rdisk0.dd (HFS USB)

While these steps worked on my test Mac, examiners should always test and research the model they are encountering. I was limited to one test system, one hard drive and FileVault2 encryption. I also recommend trying this on a test Mac before running these steps on actual evidence. Single user-mode logs in as root, and this can be very dangerous.  Remember - Trust but Verify! :)


Thursday, June 16, 2016

How to image a Mac with Live Linux bootable USB

One thing I've learned when it's comes to imaging Macs is it's good to have options. When encountering Macs, its seems like there is always a challenge. No firewire ports for target disk mode, no easy way to remove the hard drive, or if the the hard drive is removed, you don't have the specific adapter needed to connect your write blocker to the drive... and of course, encryption. I am planning on doing several blog posts about different ways to image a Mac. Depending on the situation, some may work, some may not, but I just wanted to throw some options out in the Google soup mix.

The first option I am going to go walk through is imaging a Mac with a Live Linux bootable USB. Many times cracking open something like a MacBook Air to grab a hard drive requires special tools and adapters which may not be readily available. If the Mac is already powered off, booting the Mac with a live Linux distro may be a good option. Once booted into Linux, an imaging tool with a GUI, like Guymager, can be used to create an image in E01 or dd format.

For this post, I have selected the CAINE distro. CAINE stands for Computer Aided Investigated Environment. This distro was made specifically for computer forensics. Upon boot, CAINE "blocks all the block devices (e.g. /dev/sda), in Read-Only mode." The examiner must take active steps, which includes nice big warnings, to turn off this feature.

While I did get Kali to work, it did not seem to offer the extra protection that CAINE did to keep the examiner for inadvertently mounting the wrong drive. If you are interested in making a Kali bootable USB drive for the Mac, I have included some brief instructions at the bottom of the post.

This method was tested with CAINE 7.0, Rufus 2.9, and a MacBook Air Early 2015 model

Create the Bootable USB

The first step is to create a bootable USB drive on a Windows machine. Download the CAINE iso and Rufus. Rufus is the Windows program that will create a bootable USB drive from the iso. Simply launch Rufus and select the CAINE iso as well as a blank USB drive bigger than 4GB. (NOTE - I tried various other tools to create the bootable USB drive, and not all of them worked when it came time to boot the Mac. Thanks to @APFMarc for the tip on Rufus). Below is a screen shot with the settings I used:


There was a pop up dialog box when I clicked start asking me to choose to write in ISO image mode or DD Image mode. I used the default, which was ISO mode.

Boot into Linux

Once completed, this USB drive can be used to boot the Mac. In order to boot a Mac from a USB device, it must be put into Startup Mode. This is done by holding down the Alt/Option button when the systems boots. Once in Startup Mode, the boot device can be selected. The CAINE USB should show up as the EFI Boot choice:


After CAINE boots, choose the "Boot Live system". If all goes well, the following desktop should appear:


CAINE has a utility called Mounter, which is located in the task bar. It's the tiny icon circled above. Double clicking this icon brings up a dialog box that shows which block devices are currently mounted:


 As demonstrated in the screen shot above, the only device that is currently mounted is the USB containing the CAINE distro (Shown as CAINLIVE). Running the df command also confirmed this:


The reason I like CAINE is that it does not let the examiner inadvertently mount a drive by accidentally clicking on something. For example, when I double clicked the Macintosh HD it gave me an error:


From the CAINE website documentation:
This new write-blocking method assures all disks are really preserved from accidentally writing operations, because they are locked in Read-Only mode.
If you need to write a disk, you can unlock it with BlockOn/Off or using "Mounter" changing the policy in writable mode. 
I personally prefer this extra layer of protection.

Mount the USB drive that will hold the image

Next, an external USB drive is needed to dump the image on. This external device needs to be mounted writable so the image can be placed on it. To do this, Read only mode needs to be turned off for any newly attached devices by using the Mounter program. Right clicking the Mounter icon in the task bar brings up the following dialog box:


I know this looks scary, all in red and what not, but clicking it brings up another dialog box confirming that this action will only make newly mounted devices writable, which is what is needed so the image can be dumped to the external drive:


After selecting Yes, a brief confirmation message pops up and the icon in the tray also turns red indicating the current status:


The next step is to plug in the USB drive that will contain the image. I named my external USB drive "Images" and formatted it with NTFS on a Windows system before beginning this process (FAT32 will work as well, just be aware of the 4GB file limit). Once the drive is plugged in, it can be mounted by opening up the "Caine's Home" folder on the desktop and double clicking the drive. This will mount the drive to /media/CAINE/YourDriveName:


Now the drive can be accessed to create folders, dump the image to etc. Note - if I try and do the same with the other devices on the host drive (e.g. BOOTCAMP and Macintosh HD), it will give me an error, thereby preventing me from accidentally mounting them.

Use Guymager to create the image

Now that the external USB drive is mounted, Guymager can be started to to create the image. Guymager is found on the Desktop, or under Menu>Forensic Tools>Guymager.

Once launched, select the device that needs to be imaged by right clicking it. In this example, the drive I want is the "ATA Apple SSD SM0256G":


The next step is to fill out all the requisite image data:


Once started, the previous table will show a status on the imaging process. When the image is complete Guymager will create a log file in the same directory as the image. An interesting tidbit - a while back, Eric Zimmerman did some testing on various imaging tools, and Guymager was one of the fastest :)


Kali live Linux bootable USB for Mac

So far, I've only found one method that works consistently to boot into Kali Linux on a Mac (at least on my test Mac). That method is to use the Mac Linux USB Loader on a Mac to create the bootable USB.

There is a video here that has step by step instructions for the Mac Linux USB Loader, but it's pretty straight forward to use. The basic steps are 1) Download Kali Linux; 2) Using Disk Utilities on Mac to format a USB drive with Fat32 and MBR; 3) Run Mac Linux USB Loader and select the Kali Iso; 4) Choose Kali from the distro type

You can now boot into Kali and use Guymager on a Mac using the same steps I detailed in the sections above. One very important thing to note - using this method will automatically boot you into the Kali Live environment and you will not be given the choice for the Kali Linux Forensics Mode.

In my limited testing it does not appear to mount the host drive, or make any changes to the drive. It also does not have the additional steps and warnings when it comes to inadvertently mounting drives that CAINE does. The Live version will also auto-mount plugged in USB devices. Proceed at your own risk, and as they state on the Kali website:
If you plan on using Kali for real world forensics of any type, we recommend that you don’t just take our word for any of this. All forensic tools should always be validated to ensure that you know how they will behave in any circumstance in which you are going to be using them
Echoing these same sediments, although I have walked though a method of imaging a Mac from a live Linux distro, please test and validate before using either of these methods in the the real world.

Happy Mac-ing!


Monday, May 16, 2016

QuickLook Python Parser - all your BLOBs belong to us

I've always mentioned in my presentations and blog posts that if anyone needs any help parsing an artifact, to hit me up - I love working on these types of projects in my spare time. Matthew Feilen (@mattevps) did just that. The artifact in need of parsing was the index.sqlite file which is part of the
OS X QuickLook feature. While an SQL query can pull most of the data, there is a plist file stored as a BLOB (Binary Large Object) that needs to be parsed. This BLOB has additional data that can be useful to an examiner. Read on for more details.

QuickLook Background

The QuickLook database stores information about thumbnails that have been generated on a Mac.
This information includes things like the file path to the original file, a hit count, the last date and time the thumbnail was accessed, the original file size and last modified date of the original file.

The cool thing is that this database can contain entries after a file has been deleted as well as entries for externally mounted volumes, like thumb drives. This database can also persist after a user account has been deleted since it's not located in a user directory. Sara Newcomer wrote an excellent white paper that details this artifact. I suggest reading her white paper for the finer points since my focus will be mainly on parsing the data out.

There is an index.sqlite file for each user on the system. These files are located under /private/var/folders/<random>/<random>/C/com.apple.QuickLook.thumbnailcache. The <random><random> will be different for each user. Since this database is not stored under a user's folder, you will need to tie the index.sqlite to a user by checking the permissions on the file. If you're on a live system, it's pretty easy to do with the ls -l command. However, if you have an image it may be a little more involved. One way I found to do this is to check the owner properties on the file, than cross reference this to the user's plist file. In the example below, I've used FTK Imager to view the UID of the index.sqlite file, which is 501:
UID of the index.sqlite file
Next, I exported out the user's plist file located under /private/var/db/dslocal/node/Default/users and used plist editor to locate the UID for that user:


UID in user plist file


Getting the Data Out

There are two tables of interest in the QuickLook index.sqlite file, the "files" table and the "thumbnails" table. Most of the information contained in these two tables can be pulled with an SQL query. In fact, a blog post by a "Dave" details how to write an SQL query to join these two tables and decode the Mac absolute timestamps. However, the "files" table contains a field named "version" that contains a BLOB. This BLOB, aka binary data, is a plist file:


This embedded plist file contains the last modified date of original file in Mac absolute time, the original file size, and the plugin used to generate the thumbnail:


While the SQL statement works on most of the data, an additional step is needed to parse the embedded plist file from the BLOB. The data in this plist file could be helpful to an examiner, especially if it contains information about a file that no longer exists on a system.

Python to the Rescue

There is a python library called biplist that does a great job of parsing binary plists. Using this library and the SQL syntax provided in the blog post by Dave, I was able to create a python parser in pretty short order for this artifact.


The syntax is pretty simple, just point it to the index.sqlite file:

quicklook.py -f index.sqlite >> output.tsv

If you don't already have biplist installed, it can be installed by running:

sudo easy_install biplist

I've also included a compiled executable for Windows on my github

The output looks like this with the parsed BLOB information in the Version column. As you can see in the example below, there is information for files on my system, as well as for files on a Lexar thumbdrive:


A huge thanks to Matt for contacting me about this artifact and supplying me with several test index.sqlite files. The Quicklook index.sqlite parser (both python and executable) can be downloaded from my github.


Resources:

Sara Newcomer's detailed article on the artifact: http://iacis.org/iis/2014/10_iis_2014_421-430.pdf
Dave's blog post covering the SQL query: http://www.easymetadata.com/2015/01/sqlite-analysing-the-quicklook-database-in-macos/


Monday, February 22, 2016

More on Trust Records, Macros and Security, Oh My!


There is a registry key that keeps track of which documents a user has enabled editing and macros for from untrusted locations. This happens when the user clicks the "Enable Editing" button on the Microsoft Office Protect View warning:


These can include documents that are downloaded from the Internet, or sent via email. This registry key is affectionately known as "Trust Records".  When a user clicks this warning, an entry is made under HKCU\Software\Microsoft\Office\15\Word\Security\Trusted Documents\TrustRecords that contains the file path to the document (the version number may vary - I've tested 14 and 15).
 
This is by no means a new artifact. There are several blog posts that discuss this artifact, including one by Andrew Case and Harlan Carvey - however, I believe I may have some new light to shed on this artifact. Well, I couldn't find the information by using Google, so it's new to me.

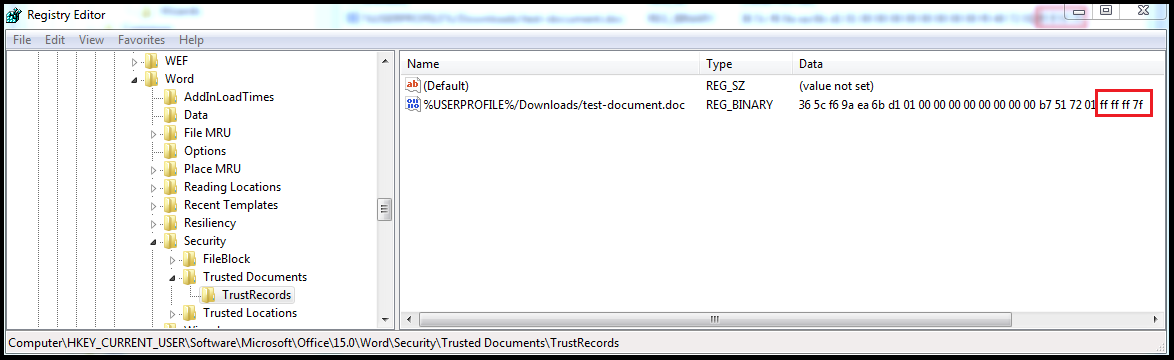
What I found was that an entry can exist under this key, but that does not necessarily mean that macros were enabled. In order to determine if macros were enabled, a flag/value needs to be checked in the binary data. Additionally, the Trust Center macro settings may need to be checked as well. The user can turn off this security prompt in the Trust Center and trust all documents by default. If this happens, no entry will be made under the Trust Records because all documents are trusted.

Why all the fuss over macros? Who uses them anyways??? Take for example the latest ransomware variant, Locky. Locky utilizes macros in a Word document to pull down it's payload. After a company get hits with something like this, they may want to know "How did this happen?" and "How can we prevent it in the future?".

The Trusted Records registry key can help answer these questions. Did the user take affirmative steps by enabling editing in the document? Did they take another step and enable the macros? If so, the company may need to spend more time training employees on better security practices. Was the system setup to trust all documents by default? If so, they may need to reconfigure their GPO.

The Trusted Records key can also contain references to artifacts that may no longer exist on the system, add context to your timeline, and demonstrates that a user explicitly interacted with the file. 

Trusted Records Registry Key

In Word 2010 (v.14)  and 2013 (v.15) there are actually two yellow banners presented to the user when macros are in a Word document. The first asks the user to "Enable Editing":


After this button is clicked, an entry is created in the registry with the document name, path and time stamp. According to some testing that Harlan did (and the testing I did confirmed this as well), the time stamp is the create date of the document, NOT the time the user enabled editing:


The output from the Regripper plugin trustrecords  is displayed below:

trustrecords v.20120716
Word
LastPurgeTime = Thu Oct  8 20:38:08 1970
Sat Feb 20 14:25:53 2016 -> %USERPROFILE%/Downloads/test-document.doc

At this point in time, I have NOT clicked the second button to enable macros, yet an entry was made under this key.

After I enable editing, a second banner pops up asking me if I would like to "Enable Content", which will enable the macros:


After I clicked this (based on my testing) the last for bytes in the binary data changes to FF FF FF 7F:


This means in order to determine if the user enable macros, these last four bytes needs to be checked.

Security Registry Key

The user can completely bypass this yellow banner by disabling the macro notifications. This means that an entry will not be recorded under the Trusted Document key even though the user ran a malicious document containing macros downloaded from the Internet. These setting are controlled by the Trust Center under Options > Trust Center > Macro Settings. There are four security levels to choose from:


These setting are stored under the registry key HKCU\Software\Microsoft\Office\15.0\Word\Security\. Based on my testing, if the user has not altered the default settings, this key does not contain the value "VBAWarnings". However, if changes are made to the default settings, an entry for VBAWarrnings will appear, and will have a DWORD value:


Based on my testing with Word 2015, these are the Macro Settings and corresponding values for the registry flag:

  • Disable all macros without notification : 4
  • Disable all macros with notification: 2
  • Disable all macros except digitally signed macros: 3
  • Enable all macros: 1

I believe these setting are also affect by a GPO, but I have not been able to confirm this yet through testing.

My testing was done using Office 2015 on Windows 7 and Office 2010 on Windows 10. These setting may also apply to Excel, Access and PowerPoint, but I have not tested these.


So, to summarize:

1) These artifacts may remain after the malicious document has been removed. They may also be shown in your timeline if you are using a tool like regtime.exe to add registry keys into your timeline.

2) If there is an entry for a document under Trusted Records, this does not necessarily mean that macros were enabled. The flag needs to be checked to make that determination.

3) If a document does not appear under this key, this does not mean that the macros were not able to run. They could still have ran if the default setting was altered to enable all macros by default.


Additional Resources:

NTUSER Trust Records

Plan and configure Trusted Locations settings for Office 2013

HowTo: Determine User Access To Files


Sunday, September 20, 2015

Who's your Master? : MFT Parsers Reviewed

The Master File Table (MFT) contains the information related to folders and files on an NTFS system. Brian Carrier (2005) stated “The Master File Table is the heart of NTFS because it contains the information about all files and directories” (p. 274) Many of the forensics tools such as EnCase, FTK and X-Ways parse the MFT to display the file and folder structure to the user.

During Incident Response, there could be hundreds if not thousands of computers to examine. A way to quickly review these systems for Indicators of Compromise (IOCs) is to grab the MFT file rather than take a full disk image. The MFT file is much smaller in size than a disk image and can be parsed to show existing as well as deleted files on a system.

During a case, I noted some anomalies with a tool that I use to accomplish this task, AnalyzeMFT. This led me to do some testing and verification of several MFT parsers – and I was a little surprised with the results. Foremost, I would like to say that I am appreciative to all the authors of these tools.  My intent with this post is to draw attention to understanding the outputs of these tools so that the examiner can correctly interpret the results.

Many of the differences and issues arose due the handling of deleted files. The documentation of one of the tools I tested, MFTDump, explains the issues with deleted files in the MFT:
"Since MFTDump only has access to the $MFT file, it is not possible to “chase‟ down deleted files through the $INDEX_ALLOC structures to determine if the file is an orphan. Instead, the tool uses the resident $FILE_NAME attribute to determine its parent folder, and follows the folder path to the root folder. In the case of deleted files, this information may or may not be accurate. To determine the exact status of a deleted file, you need to analyze the file system in a forensic tool."
Some of the tools did not notify the examiner that the file path associated with the deleted file may be incorrect  – which could lead to some false conclusions.

There are a lot of tools that parse the MFT. For this testing, I focused on tools that are free, command line and output the results into Bodyfile format. The reason I chose to do this is that when I parse the MFT, I am using it to create a timeline, usually in an automated fashion. The one exception to this was the tool MFTDump.  The output was a TSV file that I wrote a parser for that converted it into Bodyfile format.

There were four “things” that I was checking each tool for:  File Size, Deleted Files, Deleted File Paths and Speed. This criteria may not be important to everyone, but I’ll explain why these are important to me.
  1. File Size
    When looking for IOC’s, file size can be used to distinguish a legitimate file from malware that has the same name.  It could also be used in lieu of file hashes. Instead of hashing every file on the computer which can be time consuming, the hashed file's size can be used to do a comparison of the MFT file sizes to flag suspect files (thanks to @rdormi for that idea)
  2. Deleted Files
    MFT records can contain deleted file information. Does the output show deleted files? In some cases the attacker’s tools and malware have been removed from the system, so being able to see deleted files is nice.
  3. Deleted File Paths
    Is the tool able to resolve and display any portion of the previous file path for the deleted file? Knowing the parent path helps give context to the file. For example, it may be located under a user account, or a suspicious location, like a temp folder.
  4. Speed
    If I am processing thousands of machines, I need a tool that will parse the MFT relatively quickly. 10 minutes per machine or 1 hour per machine can make a big difference.

Findings

The tools I tested were AnalyzeMFT, log2timeline.pl, list-mft and MFTDump. Below is a summary of the findings. Further below, I explain the results in more detail, along with some sample data.

AnalyzeMFT
  1. Many files, both deleted and existing, show an incorrect file size of 0
  2. Deleted files were not designated as deleted in the output
  3. Deleted files where prepended with incorrect file paths
  4. Time to parse MFT: 11 minutes
 List-mft
  1.  File sizes were shown in the output
  2.  Deleted files were designated as deleted
  3.  No file paths were shown for deleted files
  4. Time to parse MFT: 1 hour, 49 minutes
Log2timeline.pl 
  1. No file sizes were shown in the output
  2. Deleted files were designated as deleted
  3. Deleted files were shown with correct file paths
  4. Time to parse MFT: 39 minutes
MFTDump 
  1.  File sizes were shown in the output
  2. Deleted files were designated as deleted
  3. Deleted files were enclosed  with ‘?’ to alert the examiner that file paths may be inaccurate
  4. Time to parse MFT: 7 minutes
Please note, I did not cross reference and verify every single file in the output. The observations made above were for the files that I reviewed.

What does this mean, or why are these results important?

No file size reported
The file size can help give context to a file. Having the file size can help determine if a file is suspect or not. If no file size is provided, this context is lost.

'0’ File size reported
The incorrect file size of ‘0’ can be misleading to an investigator. Take into consideration a RAM scraper output file. If an examiner is checking various systems and they see a file size of ‘0’, they might think the file is empty, when in fact, it could have thousands of credit card numbers written to it.

Files are not being reported/noted as deleted
Since there is no designation that the file is deleted, malware might appear to exist on a system, when in fact, it has been deleted. A suspect may have deleted a file and it is still showing as active in the output.

Deleted files are being associated with the wrong parent path
As noted above, due to issues with looking up the parent folder for deleted files, incorrect file paths were found to be prepended to deleted files. Even though a portion of the path may be correct, the prepended path could cause the examiner to draw an incorrect conclusion.

For example, many times a malware file will have a legitimate windows system name, such as svchost.exe. What flags the file as suspicious is where it was/is located. If the parent path is reportedly incorrectly, a malicious file may be missed. Or, a file may my attributed to an incorrect user account because the path is listed incorrectly.

Conclusion

Based on my testing and criteria, MFTDump seems to be the best fit for my process. It contains the file sizes, and designates between an active file and a deleted file. In the event that it recovers a file path for a deleted file, it lets the examiner know that it might be inaccurate by making a notation in the output.  If any important files are found using any of these tools, it would be prudent for the examiner to verify with a full disk image.

Sample Test Data

Below, I show some examples from the output for each tool. Although I did some testing and verification, it is up to each examiner to test their tools – I accept no liability or responsibility for using these tools and relying on my results. For demonstrative purposes only. :)

I used FLS from the Sleuthkit and X-Ways to check a deleted file. I then compared how this deleted file was handled with the different tools. I also used Harlan Carvey’s tools (bodyfile.exe and parse.exe) to convert the bodyfile generated by the tool into TLN format for readability.

The deleted file I reviewed was “048002.jpg”.  The path was shown as C:/$OrphanFiles/Pornography/048002.jpg (deleted) in both FLS and X-Ways.

Each of the outputs were grepped for the file 048002.jpg, and the entries located are displayed below in TLN format. I omitted the "Type" (File), "Host" (Computer1) and "User" (blank) columns in order to better display the results.

I have also included how long each process took. The system I used was Windows 7 with an Intel i7 and 16GB of RAM. The size of the MFT was about 1.8GB (which is much larger then most systems I process)
  
FLS Output
fls -m C: -f ntfs -r \\.\[Mounted Drive] >> C:\path\to\bodyfile

Date Description
2076-11-29 08:54:34 MA.B [4995] C:/$OrphanFiles/Pornography/048002.jpg (deleted)
2014-01-11 01:25:45 ..C. [4995] C:/$OrphanFiles/Pornography/048002.jpg (deleted)
2013-10-28 20:38:37 MACB [124] C:/$OrphanFiles/Pornography/048002.jpg ($FILE_NAME) (deleted)

FLS was used as the baseline for the test, and the output was verified with X-Ways. It shows the file as a deleted Orphan file, with a partial recovered directly listing of "/Pornography/048002.jpg". According to The Sleuthkit documentation on orphan files:
"Orphan files are deleted files that still have file metadata in the file system, but that cannot be accessed from the root directory."
Fls took about 20 minutes to run accross the mounted image.

AnalyzeMFT Output
analyzeMFT.py -f "C:\path\to\$MFT" -b "C:\path\to\output\bodyfile.txt" --bodyfull -p

Date Description
2013-10-28 20:38:37 MACB [0] /Users/SpeedRacer/AppData/Roaming/Scooter Software/Beyond Compare 3/BCState.xml/Pornography/048002.jpg

AnalyzeMFT showed 0 for the file size. It had no designation in the output that flags if the file is deleted or active. Although it was able to recover the deleted file path "/Pornography/", it prepended the file path with a folder that currently exists on the system rather then identify it as an Orphan file.

This makes it appear to the examiner that this is an active file, under the location "Users/SpeedRacer/AppData/Roaming/Scooter Software/Beyond Compare 3/BCState.xml/Pornography",  when in fact, it is a deleted Orphan file.

During my review of the outputs, I noticed quite a few files were showing an incorrect file size of '0', including active files.  In the review of the open issues on github, these issues appear to have been noted.

I also ran AnalyzeMFT with the default output, a csv file. In this output, the file did have a flag designating it as deleted, however, the bodyfile format does not.

Log2Timeline.pl Output
log2timeline -z local -f mft -o tln -w /path/to/bodyfile.txt


Date Description
2014-01-11 01:25:45 FILE,-,-,[$SI ..C.] /Pornography/048002.jpg (deleted)|UTC|  inode:781789

The “old” version of log2timeline has an –f  mft option that parses an MFT file into bodyfile format. The “new” version of log2timeline with Plaso does not have the option to parse the MFT separately (at least I coudnt find it.). log2timeline.pl was run from a SIFT Virtual Machine. For the VM, I gave the VM about 11GB of RAM, and 6 CPUs. With this setup, it took about 39 minutes to parse the MFT.

No file size was provided in the log2timeline for any files. The file is flagged as deleted, and includes the correct partial recovered path /Pornography/". Out off all the MFT tools I tested, this one most accurately depicts the deleted file path. However, it's interesting to note that it did not include the FileName attribute.

list-mft Output
list-mft.py "C:\path\to\$MFT" >> "C:\path\to\output\bodyfile.txt"

Date Description
2014-01-11 01:25:45 ,..C. [4995] \\$ORPHAN\048002.jpg (inactive)
2013-10-28 20:38:37 ,MACB [4995] \\$ORPHAN\048002.jpg (filename, inactive)

list-mft provided the file size, and a designation that the file was deleted (inactive). It also identified the file as an Orphan, however, it did not recover the partial path of /Pornography/. This may be important as the partial path can help provide context for the deleted file.

This program took the longest to run at 1 hour and 49 minutes. There is a -c, cache option that can be configured. This can be increased for better performance, however, I just used the default settings.

MFTDump Output
mftdump.exe "C:\path\to\$MFT" /o "C:\path\to\output\mftdump-output.txt"

Date Description
2076-11-29 08:54:34 MA.B [4995] ?\Users\SpeedRacer\AppData\Roaming\Scooter Software\Beyond Compare 3\BCState.xml\Pornography\048002.jpg?(DELETED)
2014-01-11 01:25:45 ..C. [4995] ?\Users\SpeedRacer\AppData\Roaming\Scooter Software\Beyond Compare 3\BCState.xml\Pornography\048002.jpg?(DELETED)
2013-10-28 20:38:37 MACB [4995] ?\Users\SpeedRacer\AppData\Roaming\Scooter Software\Beyond Compare 3\BCState.xml\Pornography\048002.jpg? (DELETED)(FILENAME)

The file sizes are displayed, and a designation is included showing that the file has been deleted. Deleted files were enclosed  with ‘?’ to alert the examiner that file paths may be incorrect. This tool ran the fastest, clocking 7 minutes for a 1.8 GB MFT file. The output from this tool as a TSV file. I wrote a python script to parse it into bodyfile format.

To keep this post relativity short, I just demonstrated the output for one file, however, I used the same process on several files and the results were consistent. Whatever tool an examiner chooses to use will depend on their particular needs. For example, an examiner may not be interested in file sizes, and in this case they may choose to use log2timeline.  However, if speed is an issue, MFTDump might make more sense. As long as the examiner knows what information the output is portraying, and can verify the results independently, any of these tools can get the job done.

Carrier, B. (2005). File System Forensic Analysis. Upper Saddle River, NJ: Pearson Education

Monday, June 22, 2015

SQLite Deleted Data Parser Update - Leave no "Leaf" unturned

One of the things I love about open source is that people have the ability to update and share code.  Adrian Long, aka @Cheeky4n6Monkey, did just that. Based upon some research, he located additional deleted data that can be harvested from re-purposed SQLite pages - specifically the Leaf
Table B-Tree page type. He updated my code on GitHub and BAM!! just like that, the SQLite Deleted Data parser now recovers this information.

He has detailed all the specifics and technical goodies in a blog post, so I won't go into detail here. It involved a lot of work and I would like to extend a huge thank you to Adrian for taking the time to update the code and for sharing his research.

You can download the most recent version on my GitHub page. I've also update the command line and GUI to support the changes as well.

Tuesday, June 9, 2015

Does it make sense?


Through all my high school and college math classes, my teachers always taught me to step back after a problem was completed and ask if the answer made sense.  What did this mean?  It meant don't just punch numbers into the calculator, write the answer, and move on. It meant step back, review the problem, consider all the known information and ask, "Does the answer I came up with make sense?"

Take for instance the Pythagorean Theorem. Just by looking at the picture, I can see that C should be longer than A or B. If my answer for C was smaller than A or B, I would know to recheck my work.

Although the above example is relatively simple, this little trick applied to more complicated math problems, and many times it helped me catch incorrect answers.

But what does this have to do with DFIR?  I believe the same principle can be applied to investigations. When looking at data, sometimes stepping back and asking myself the question, "Does what I am looking at make sense?" has helped me locate issues I may not have otherwise caught.

I have had a least a couple of DFIR situations where using this method paid off.

You've got Mail...
I was working a case where a user had Mozilla Thunderbird for an email client. I parsed the email with some typical forensic tools and begin reviewing emails.

While reviewing the output, I noticed it seemed pretty sparse, even though the size of the profile folder was several gigs. This is where I stepped back and asked myself, does this make sense? It was a large profile, yet contained very few emails.  This led to my research and eventual blog post on the Thunderbird MBOXRD file format. Many of the programs were just parsing out the MBOX format and not the MBOXRD format, and thus, missing lots of emails. Had I just accepted the final output of the program, I would have missed a lot of data.

All your files belong to us...
Many times I will triage a system either while waiting for an image to complete, or as an alternate to taking an image. This is especially useful when dealing with remote systems that need to be looked at quickly. Exporting out the MFT and other files such as the Event Logs and Registry files results in a much smaller data set than a complete image. These artifacts can then be used to create a mini-timeline so analysis can begin immediately  (see Halan's post here for more details on creating mini-timelines).
 
To parse the MFT file into timeline format, I use a tool called Analyze MFT  to provide a bodyfile. Once the MFT is in bodyfile format, I use Harlan Carvey's parse.pl to convert it into TLN format and add it into the timeline.

While working a case, I created timelines using the above method for several dozen computers. After the timelines were created, I grepped out various malware references from these timelines. While reviewing the results, I noticed many of the malware files had a file size of zero. Weird. I took a closer look and noticed ALL the malware files contained a file size of zero. Hmmm.. what did that mean? What are the chances that ALL of those files would have a zero file size??? Since the full disk images were not available, validateing this information with the actual files was not an option. But I stepped backed and asked myself, given what I knew about my case and how the malware behaved.. does that make sense?

So I decided to "check my work" and do some testing with Analyze MFT. I created a virtual machine  with Windows XP and exported out the MFT.  I parsed the MFT with Analyze MFT and began looking at the results for files with a zero file size.

I noticed right away that all the prefetch files had a file size of zero, which is odd.  I was able to verify that the prefetch files sizes were in fact NOT zero by using other tools to parse the MFT, as well as looking at the prefetch files themselves in the VM. My testing confirmed that Analyze MFT was incorrectly reporting a file size of zero for some files.

After the testing I reached out to David Kovar, the author of Analyze MFT, to discuss the issue. I also submitted a bug to the github page.

If I had not "checked my work" and assumed that the the file size of  zero meant the files were empty, it could have led to an incorrect "answer".

So thanks to those teachers that ground the "does it make sense" check into my head, as it has proved to be a valuable tip that has helped me numerous times  (more so then the Pythagorean Theorem...)